


Just a reminder I do have drawstring and resealable bags for sale in my etsy shop if you need any!
Hope everyone is having a good holiday season! I am just trying to finish up some of my gifts and staring at a giant pile that needs to be wrapped! If anyone wants to help, I can pay in glasses of champagne and cranberry juice. :)

Mac and Cheese
Because I don't eat meat or seafood I am always on the lookout on how to make some killer baked Mac and Cheese. My old recipe included an egg wash which my family loved but I wasn't crazy about. I saw a recipe on another blog and have now made it twice but made some changes to what worked best for me.
Ingredients:
8 oz shredded Sharp Cheddar
8 oz shredded Fiesta Blend (Monterey Jack, Cheddar and other cheeses)
7 oz Parmesean cheese (or 8 oz- I can only find 7 oz bags)
2 cups Heavy Cream (I used heavy whipping cream because that's all I could find)
16 oz pasta (I use penne)
Cook pasta per the box directions. Make sure you don't cook too long because pasta will cook when baking too.
Reserve about 1/4-1/3 of the cheese to sprinkle on the top before baking. (I reserve the Cheddar and Fiesta cheese for the topping.)
On the stove, I add about half the cream and slowly add the cheeses to melt. I continually add the cream and cheeses until all is melted.
After pasta is finished cooking, drain and add pasta back in pot. Then add the melted cheese/cream mixture to the pot and mix thoroughly.
Pour mixed pasta and cheese into greased casserole dish. Sprinkle cheese on top and bake at 350 for 30-45 minutes.
Ingredients:
8 oz shredded Sharp Cheddar
8 oz shredded Fiesta Blend (Monterey Jack, Cheddar and other cheeses)
7 oz Parmesean cheese (or 8 oz- I can only find 7 oz bags)
2 cups Heavy Cream (I used heavy whipping cream because that's all I could find)
16 oz pasta (I use penne)
Cook pasta per the box directions. Make sure you don't cook too long because pasta will cook when baking too.
Reserve about 1/4-1/3 of the cheese to sprinkle on the top before baking. (I reserve the Cheddar and Fiesta cheese for the topping.)
On the stove, I add about half the cream and slowly add the cheeses to melt. I continually add the cream and cheeses until all is melted.
After pasta is finished cooking, drain and add pasta back in pot. Then add the melted cheese/cream mixture to the pot and mix thoroughly.
Pour mixed pasta and cheese into greased casserole dish. Sprinkle cheese on top and bake at 350 for 30-45 minutes.
Brother PE780-D: How to resize an image
You can adjust the size of your design in your machine approximately 20% bigger or smaller. Here are some screen shots to show you how to do this properly....
This is the home screen on the machine. The top 4 icons are all the built in designs that came with the machine. On the second rown, the icons stand for the following: access designs saved on a card, access designs saved to your machine, access designs saved to your USB stick, move your hoop.

Next, I choose a design from my USB stick. I chose a football truck purchased from Applique Market. This is the screen that you get after you choose a design. Up top it shows how many steps there are (18) and the different colors that were saved for each step of the design. Sometimes I show the color up at the top, sometimes I change that setting to show the stitch count. There were be a tutorial later on how to change that. Now choose the adjust button that I pointed to below.

The next screen shows your options in the Adjust screen. Choose "Layout" in order to resize your image.

Now choose the "Size" option that is bolded in the top right hand of the screen. The button under "Layout" that is all the way to the right of the screen will enlarge the image. The one under it will shrink the image. If I am working on a toddler shirt, I will usually enlarge the image enough to fill up my entire 5"x7" hoop.

This is the home screen on the machine. The top 4 icons are all the built in designs that came with the machine. On the second rown, the icons stand for the following: access designs saved on a card, access designs saved to your machine, access designs saved to your USB stick, move your hoop.

Next, I choose a design from my USB stick. I chose a football truck purchased from Applique Market. This is the screen that you get after you choose a design. Up top it shows how many steps there are (18) and the different colors that were saved for each step of the design. Sometimes I show the color up at the top, sometimes I change that setting to show the stitch count. There were be a tutorial later on how to change that. Now choose the adjust button that I pointed to below.

The next screen shows your options in the Adjust screen. Choose "Layout" in order to resize your image.

Now choose the "Size" option that is bolded in the top right hand of the screen. The button under "Layout" that is all the way to the right of the screen will enlarge the image. The one under it will shrink the image. If I am working on a toddler shirt, I will usually enlarge the image enough to fill up my entire 5"x7" hoop.

Hope this helps you on how to resize a design in your Brother PE780-D!
Brother PE780-D
Whether you already have a machine or are looking to get one, the first question I usually get asked is what machine do I own?
Currently, I own the PE780D. In my opinion, this is an awesome starter machine. I have never sewed or appliqued before owning this machine so I did some research before going to my local dealer to purchase. First piece of advice I read was- Purchase a machine that has at least a 5"x7" hoop size. I couldn't agree more. I RARELY use my 4"x4" hoop to applique. Mainly I use that smaller hoop to embroider names, applique burp cloths or applique tiny newborn onesies.
If you happened to purchase your machine online, you probably need a little help to figure out how to use it. The user manual does have most of this information in it. Incase you need even more visuals, hopefully the series of blog posts I am working on will help! Stay tuned for some tutorials to be posted later this week on this machine! :)
Currently, I own the PE780D. In my opinion, this is an awesome starter machine. I have never sewed or appliqued before owning this machine so I did some research before going to my local dealer to purchase. First piece of advice I read was- Purchase a machine that has at least a 5"x7" hoop size. I couldn't agree more. I RARELY use my 4"x4" hoop to applique. Mainly I use that smaller hoop to embroider names, applique burp cloths or applique tiny newborn onesies.
If you happened to purchase your machine online, you probably need a little help to figure out how to use it. The user manual does have most of this information in it. Incase you need even more visuals, hopefully the series of blog posts I am working on will help! Stay tuned for some tutorials to be posted later this week on this machine! :)
Packaging Products Professionally
I have so many size and style bags to package my products with! I thought I would let you know what I use and for what.
-Bitty Bags from Studio MCA Designs . I absolutely LOVE these bags! They are so cute to display your finished products in when giving or sending to your customer. I use these primarily for my wedding hankies that I embroider. I have also used them for bloomers or boxers- anything small like that will do!
-Resealable 6" x 9" bags. (I sell these HERE). I use these for small baby items such as bloomers, boxers, bibs, newborn onesies. Basically anything that will fit because these are the cheapest bags for me to carry so I tend to gravitate towards these if I can.
-Drawstring Bags 9" x 12". (I sell these HERE). These are the most popular size and style bags I see many ladies use. They can fit multiple shirts. I use these for items that will not fit in the resealable bags and I do place more than one shirt in here. I think 3 or 4 shirts would fit in here nicely.
-Drawstring Bags 12" x 15". (I sell these HERE). These are a larger version of the last bag. I have some big bulky baby items, such as hooded bath towels and baby bath sacks, that I will be using this bigger bag for.
I do tie my business card to all of the bags using this twine from Studio MCA Designs. I LOVE it. It is so cute and adds another POP of color to my presentation. (I have the teal.)
Hope this helps!
-Bitty Bags from Studio MCA Designs . I absolutely LOVE these bags! They are so cute to display your finished products in when giving or sending to your customer. I use these primarily for my wedding hankies that I embroider. I have also used them for bloomers or boxers- anything small like that will do!
-Resealable 6" x 9" bags. (I sell these HERE). I use these for small baby items such as bloomers, boxers, bibs, newborn onesies. Basically anything that will fit because these are the cheapest bags for me to carry so I tend to gravitate towards these if I can.
-Drawstring Bags 9" x 12". (I sell these HERE). These are the most popular size and style bags I see many ladies use. They can fit multiple shirts. I use these for items that will not fit in the resealable bags and I do place more than one shirt in here. I think 3 or 4 shirts would fit in here nicely.
-Drawstring Bags 12" x 15". (I sell these HERE). These are a larger version of the last bag. I have some big bulky baby items, such as hooded bath towels and baby bath sacks, that I will be using this bigger bag for.
I do tie my business card to all of the bags using this twine from Studio MCA Designs. I LOVE it. It is so cute and adds another POP of color to my presentation. (I have the teal.)
Hope this helps!
My "Hooping" Technique
I have posted this on Applique Forum but thought I would share it here! When I first got my machine, I could not figure out for the life of me how not to sew the back of tiny shirts and onesies! With the help of a wonderful lady at AllBrands where I bought my machine, I discovered what worked for me.
FAQ's:
I do not hoop anything- EVER.
I do not prewash anything- EVER.
I use Sulky's medium cutaway most of the time. Every once in a while I will use medium tearaway but rarely.
I use my 4"x4" hoop for burp cloths and newborn onesies. Anything bigger gets my 5"x7"
1. Iron and startch (if needed) the shirt to get the wrinkles out.
2. Turn the shirt inside out.
3. Line up the side seams of the shirt and iron a crease down the center of the shirt.
4. Hoop your stabilizer and spray it with adhesive. I use 505 spray that I buy at my local All Brands. I purchase my stabilizer at Hancock Fabrics when they are 50% off.
 5. Place shirt or onesie that is inside out on flat surface. I use my ironing board.
6. Line up center of hoop with center crease in shirt and place face down on shirt. Measure middle of shirt if needed.
 7. Press down to secure shirt to sticky stabilizer.
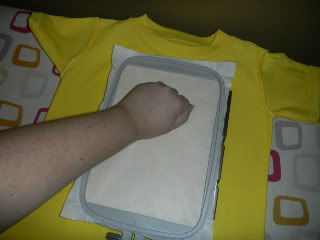 8. Flip the hoop and shirt over. I put my hand on the top of the shirt when I flip it so it doesn't move off of the stabilizer.
 9. Your shirt/onesie should look like this! I then rub out any wrinkles that may exist in the shirt that is on the stabilizer.
  10. Don't forget to hold the shirt out of the way when embroidering! You need to "babysit" it, especially on tiny onesies! I usually have to constantly move extra material out of the way with the tiny clothing items.
 Hope this helps!
FAQ's:
I do not hoop anything- EVER.
I do not prewash anything- EVER.
I use Sulky's medium cutaway most of the time. Every once in a while I will use medium tearaway but rarely.
I use my 4"x4" hoop for burp cloths and newborn onesies. Anything bigger gets my 5"x7"
1. Iron and startch (if needed) the shirt to get the wrinkles out.
2. Turn the shirt inside out.
3. Line up the side seams of the shirt and iron a crease down the center of the shirt.
4. Hoop your stabilizer and spray it with adhesive. I use 505 spray that I buy at my local All Brands. I purchase my stabilizer at Hancock Fabrics when they are 50% off.
6. Line up center of hoop with center crease in shirt and place face down on shirt. Measure middle of shirt if needed.
Tutorials and Supplies
In the next month, I have the following tutorials of what I do when I work in the works. Make sure you suscribe to the blog to get all the latest news!
1. How I embroider/applique a shirt from start to finish. This includes my "hooping" technique and how I assemble the shirt for a cute finished product to send to the client.
2. How to navigate easily using the same machine as me- Brother 780-D (same as Brother 770).
3. Where I purchase most of supplies from
These are the main questions I see pop up a lot in the Applique Forum and I would love to help you in any way I can! Be on the lookout for these in the next month!
Have a good week!
1. How I embroider/applique a shirt from start to finish. This includes my "hooping" technique and how I assemble the shirt for a cute finished product to send to the client.
2. How to navigate easily using the same machine as me- Brother 780-D (same as Brother 770).
3. Where I purchase most of supplies from
These are the main questions I see pop up a lot in the Applique Forum and I would love to help you in any way I can! Be on the lookout for these in the next month!
Have a good week!
Subscribe to:
Posts (Atom)